Once you have joined Deflect, you can use the Dashboard also as a control panel to manage DNS records, add new websites, change your account settings or the panel language, report incidents, ask for support, manage your websites’ settings and notify an attack.
Side panel
Deflect protected websites
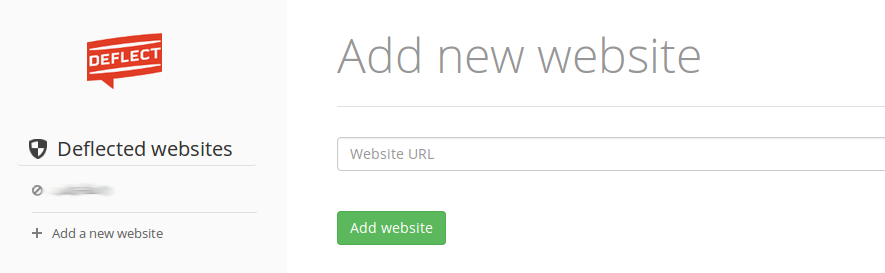
In the Deflected websites section of the side panel, you will find a list of the websites you are protecting with Deflect.
If you are waiting for your request to be finalized, by clicking on the website address in the sidebar, you will access a page where you can check the status of your request.
In the same section you can also add a new website by clicking on “Add a new website”.
- To add a new site to the websites you want to protect, enter its URL in the form, click on “Add website”, then follow the step-by-step instructions starting from Step 1. Note that if you want to register a sub-site (e.g. sub.domain.org) you will have to add it as a new website by clicking on this button.
Once your website is on Deflect, by clicking on its address in the sidebar you will access a control panel to check your website’s statistics, manage DNS records, add new users, and configure security and administration settings.
My account
In the My account section, you can manage your account settings by clicking on Settings. You will thus access a screen where you can update your email address and password.
Two-Factor Authentication
Two-factor authentication (also known as 2FA) is a security process in which the user provides two authentication factors to verify they are who they say they are. 2FA can be contrasted with single-factor authentication (SFA), a security process in which the user provides only one factor – typically a password.
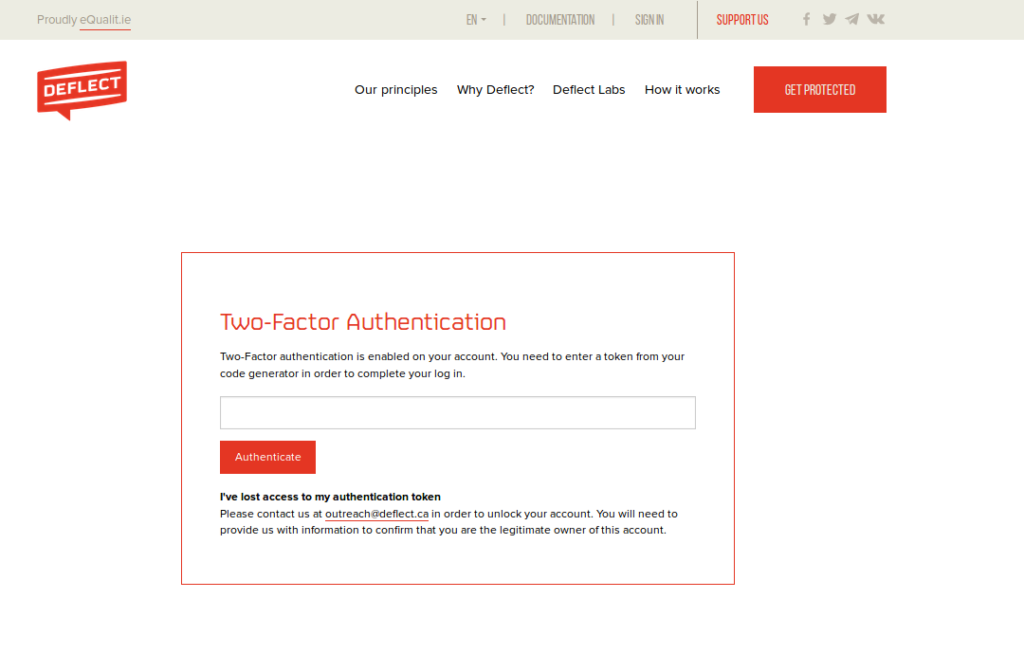
It’s not mandatory to enable 2FA, but it will add an extra layer of security to your account. To log-in with 2FA, you’ll need to provide a code along with your username and password. This lets us know it’s actually you.

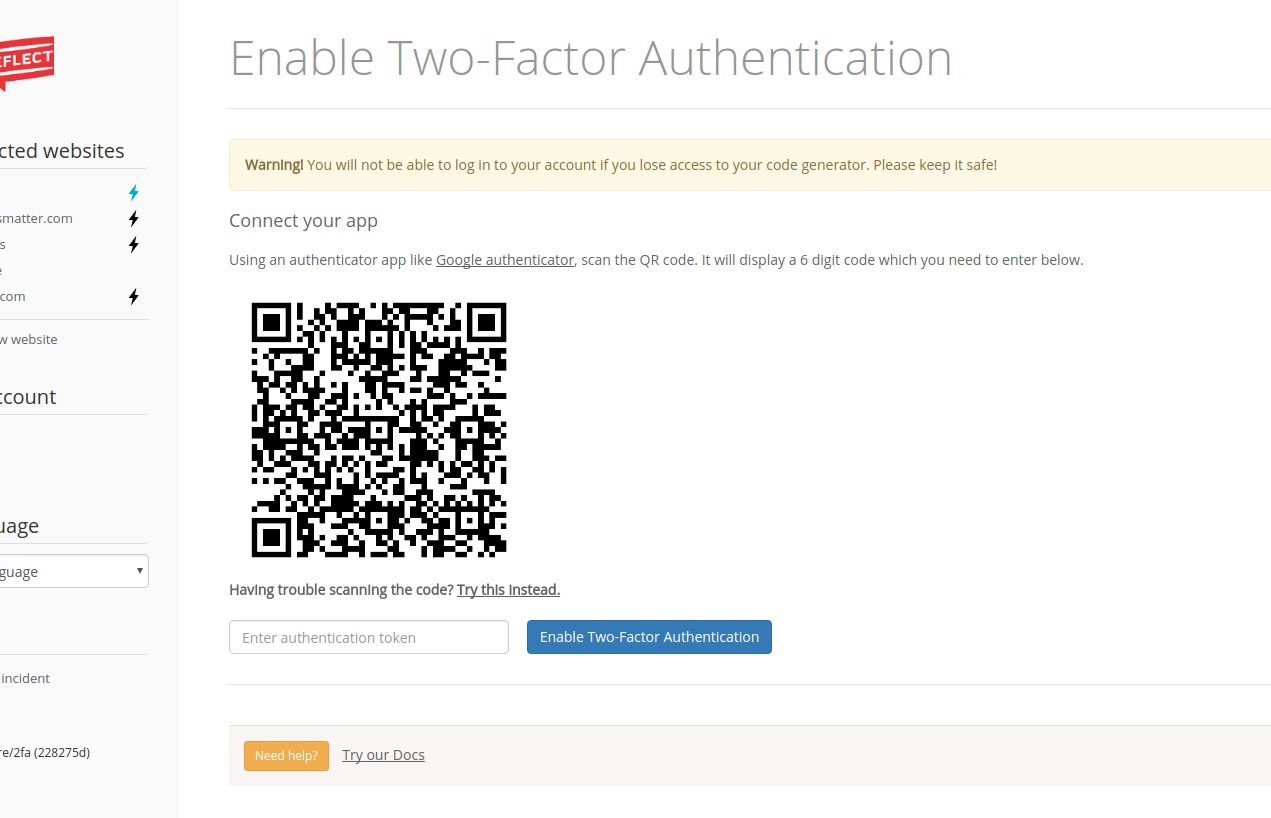
The next step displays a scannable QR code which automatically configures 2FA mobile apps such as Google Authenticator. A backup code is shown as well, which allows you to set up your code generator again in case you lose access to the generator. Please write it down and store it in a safe place!
After scanning the QR code, a 6 digit code will be displayed on your phone. You need to enter the code in the token field. Then click “enable two-factor authentication”. You are all set now.
If at some point you decide that you want to disable 2FA, you need another TOTP (time-based one-time Password) which can be generated with the authenticator app you have used to enable 2FA.
Fill in the displayed code in the “disable two-factor authentication” field. Two-factor authentication is now disabled.
Users with 2FA enabled will be automatically redirected and prompted for their 2FA code before they are signed in.
Help
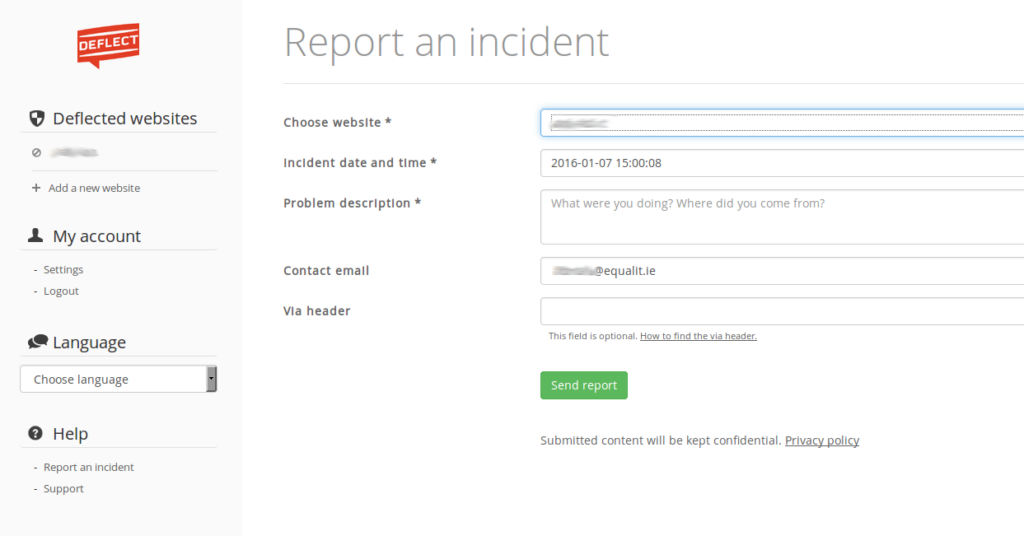
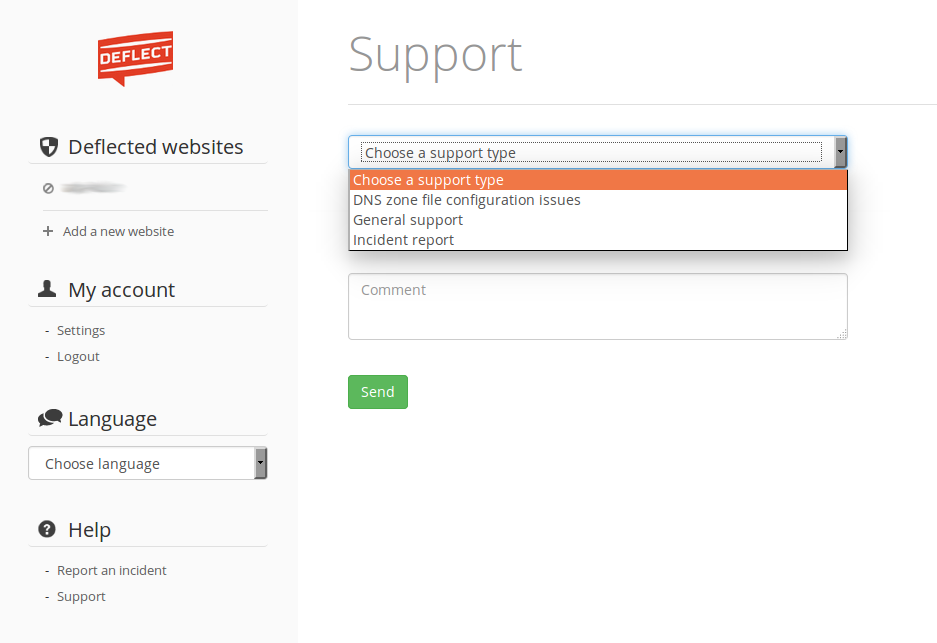
In this section you can either Report an incident or ask for support.
If your protected website is experiencing problems, or you think that Deflect is not working properly, please click on “Report an incident” and fill the form specifying the concerned website and providing as many details as possible.
If, on the other hand, you need our help to set up your website, click on “Support” and fill the form by choosing a support type, specifying the concerned website and adding any information that may be needed in the comment.
Website settings
To manage your website, click on its address in the sidebar of the Dashboard: you will access a control panel where you can check your website’s statistics, manage DNS records, add new users, and configure security and administration settings.
Stats tab
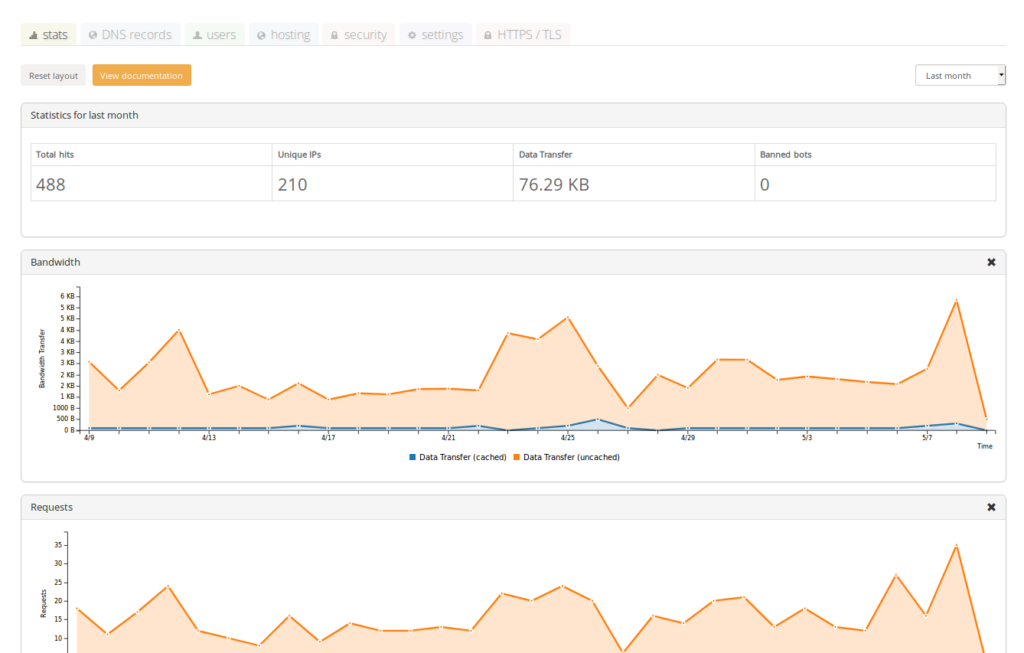
The Stats tab is the first thing you will see when accessing the Dashboard. Here you will find graphs with statistics on the traffic directed to your website, including visitors and banned bots.
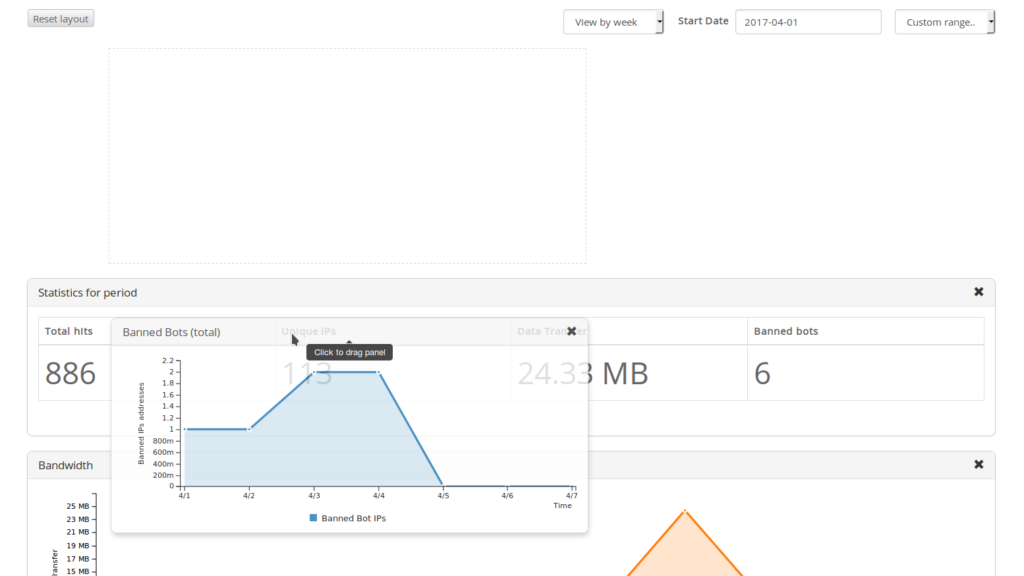
By clicking on the grey top bar of each graph, you can move the graphs around the screen, and move to the top the statistics you find most useful to manage your website.
If you want to revert to the original order, simply click on the “Reset layout” button in the top left corner of the tab.
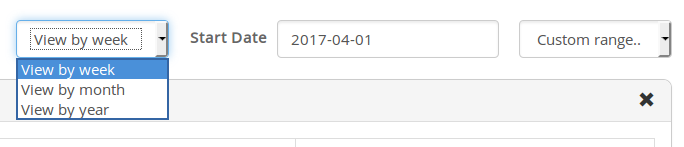
When you access the Dashboard, the default time range of your graphs is the last 30 days, but you can change this value to the last hour or the last 12 months by clicking on the time range dropdown menu in the top right corner of the tab.
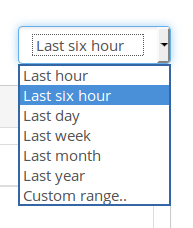
By selecting “Custom range”, a menu appears that allows you to select a starting date and then visualize the statistics for a week, a month or a year starting from the selected date.
Please note that because of the huge amount of data we have to process, numbers are in some cases approximate (read this page for a scientific explanation of one of the approximations). Accuracy normally varies between 90% to 100%, with tables showing the top countries, user agents and URLs being the most approximate.
Normally we expect logs to arrive into Dashboard within a few seconds, but sometimes there are issues with log delivery, like maintenance work or the occasional unplanned outage somewhere in the system. Data from more than a couple of days ago should always be reliable. Very recent data like “Last hour” is not guaranteed to be accurate.
The data visualized in the graph include:
- Statistics for period – the total number of:
- requests received by your website (Total hits),
- unique visitors (Unique IPs),
- volume of data transferred from your website to your visitors’ computers (Data transfer),
- IPs identified as malicious and banned by Deflect (Banned bots)
- Bandwidth: the volume of data transferred from your website to your visitors’ computers over the selected time range
- Requests: the requests received by your website
- Unique IPs (total): the unique visitors sending requests to your website
- Banned Bots (total): the IPs identified as malicious and banned by Deflect
- Hits by country (top 10): the top ten countries of requests to your website, viewed over time
- Banned Bots by country (top 10): the top ten countries of Bots targetting your website, viewed over time
- Top User Agents: the browser used by your public to visit your website, as well as the spiders and crawlers that have visited your website. Malicious bots spoof their user agents most of the time, masquerading for example as “Wordpress” or “Opera” – https://en.wikipedia.org/wiki/User_agent
- Top Viewed Pages: the most visited pages in your website, not including site artefacts like javascript, css, etc.
- Top URLs: the most requested objects in your website, including all site artefacts like javascript, css, etc.
- HTTP status codes: the status code included in the responses sent by your website to your visitors to indicate the reasons for the availability or unavailability of the requested resource – https://en.wikipedia.org/wiki/List_of_HTTP_status_codes
- Cache Hit/Miss: The percentage of resources that were already available in the cache of your website stored in Deflect’s edges (“Served from cache”) and of resources that weren’t stored in the cache and had to be retrieved from your web server (“Served from origin”) (Read this page to learn more about how Deflect edges work
- Top Countries: The top countries of origin of requests received by your website
- Top Bot Countries: The top countries of origin of malicious bots
- Top Traffic Sources: A map of the number of requests received by your website from each country
DNS records tab
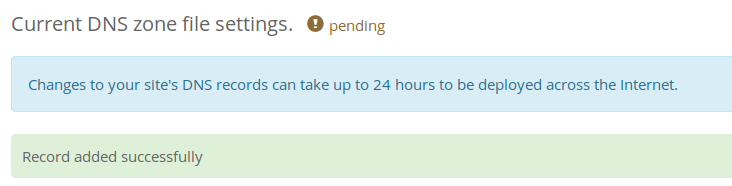
When you register a website on Deflect, the Deflect system locates automatically your website’s DNS settings, and you can simply accept them or edit what needs to be changed by deleting or adding records. If you need to change your DNS records when your site is already protected by Deflect, you can click on the DNS records tab in your Dashboard.

Every change you make to your DNS records goes through a validation process that checks if your changes are correct and your DNS records are reliable. If your changes are correct, they will be implemented automatically. As you will notice, the Dashboard will also inform you if your change is pending or has been implemented, to offer you as much control as possible over every operation.
Here is a short explanation on DNS records and their meaning:
- A website.com 129.128.127.210 -> this is the main record for the domain, also referred to as the origin IP or root record
- CNAME www website.com -> this is usually an alias (CNAME) allowing people to type www.website.com and get to your site
- MX website.com mail.website.com -> this record is for email (MX) e.g. user@website.com
- A mail.website.com 129.128.127.210 -> this record allows email delivery to your server. It is connected with the MX record above
- NS ns1.website.com -> nameserver for your domain. You can leave this record as is
- TXT website.com ‘This is a test’ -> sometimes a text record (TXT) is appended to a domain. You can leave this as is
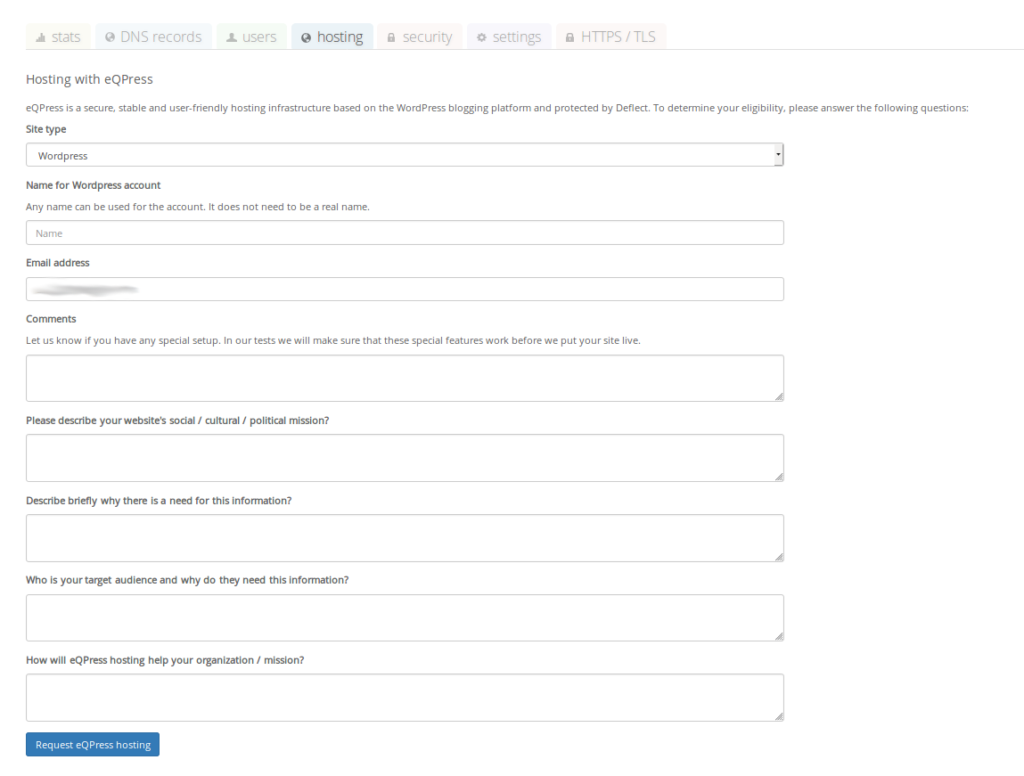
Hosting tab
On the hosting tab, you can request eQPress hosting. This hosting service is for WordPress websites, and includes migration support, website maintenance, security updates and monitoring. To make sure you meet the eligibility requirements for this free service, some questions need to be answered. When ready, click “request eQPress hosting” and a ticket is created for our systems team, who will reach out shortly to discuss the migration.
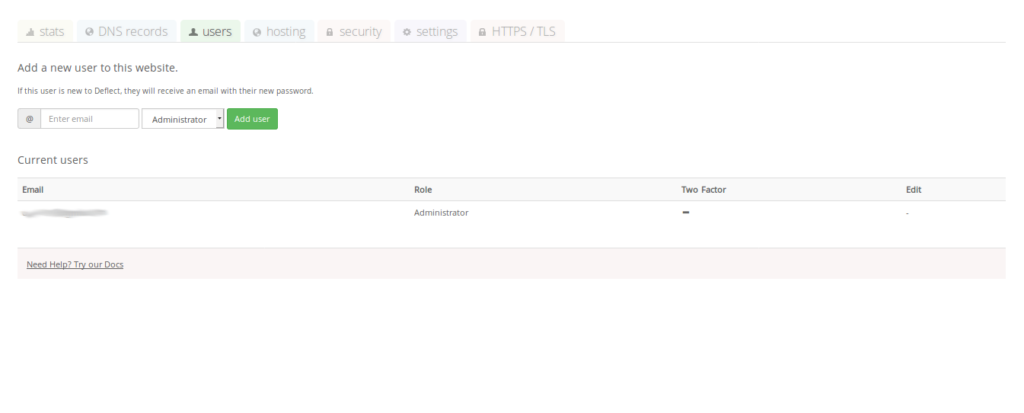
Users tab
To manage your website’s users, click on “users” in the toolbar. A window with a list of users and a form for adding new users to the Deflect control panel will appear.
If you want to allow new users to access the control panel for the selected website, just enter the new user’s email address in the form and click on “Add user”. The new user will be added to the “Current users” list.
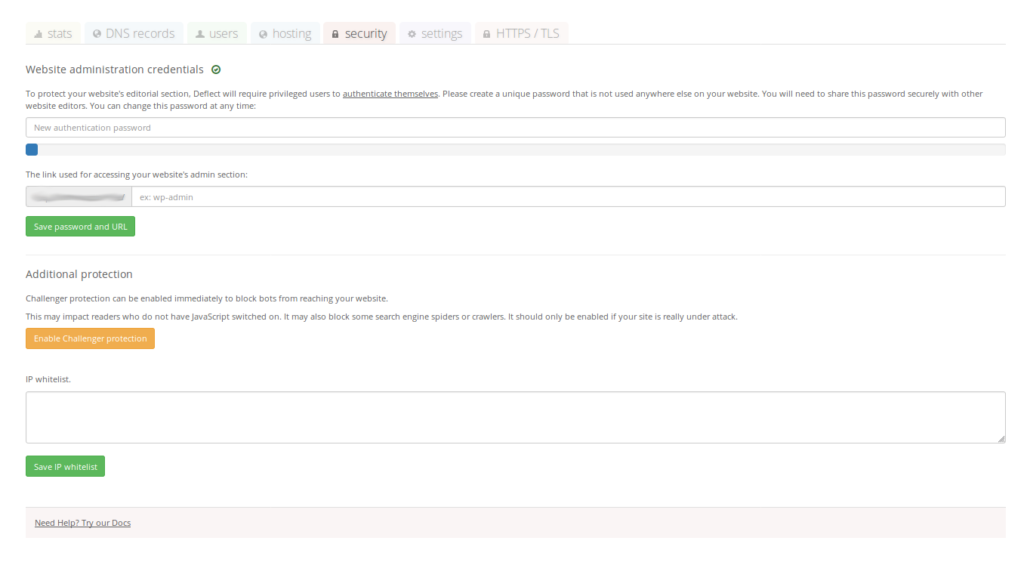
Security tab
Click on “security” in the toolbar to access your website’s security settings. In this section you can change your administration credentials for accessing the editorial section of your website (for example the WordPress or Joomla administration interface), and you can also add or change your SSL/TLS certificates.
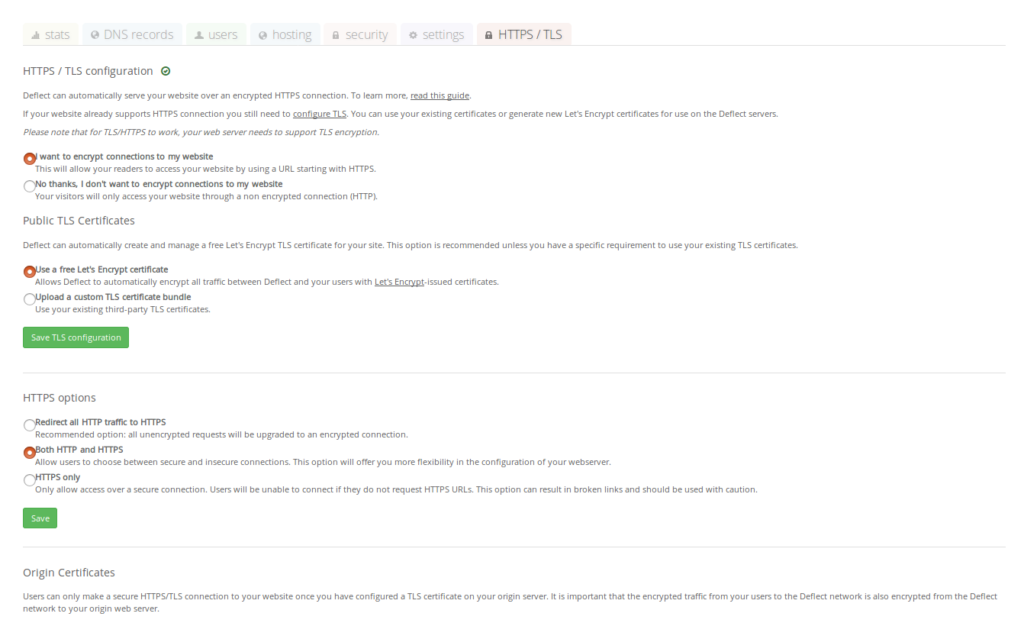
HTTPS/TLS tab
Deflect can automatically serve your website over an encrypted HTTPS connection. To learn more, read this guide HTTPS / TLS configuration.
If your website already supports HTTPS connection you still need to configure TLS. You can use your existing certificates or generate new Let’s Encrypt certificates for use on the Deflect servers.
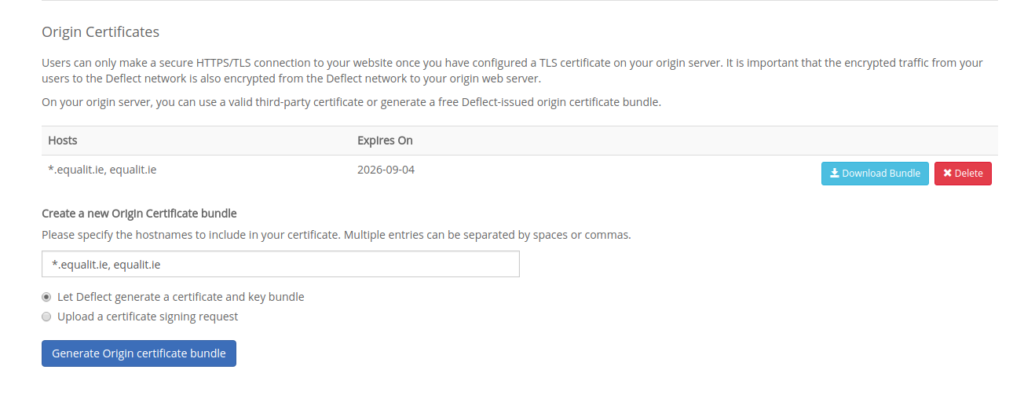
Origin Certificates
- To ask Deflect to create an origin certificate for you, click the “Let Deflect generate a certificate and key bundle” button.
- To create an origin certificate yourself and upload a Certificate Signing Request for Deflect to sign, click the “Upload a certificate signing request” button and paste your PEM encoded CSR in the form that will automatically open.
By clicking the “Generate Origin certificate bundle” button, a certificate will be generated automatically and appear in the list of generated origin certificates. Click “Download bundle” to download a zip file containing the files you need to install in your web server to enable TLS connections with Deflect.
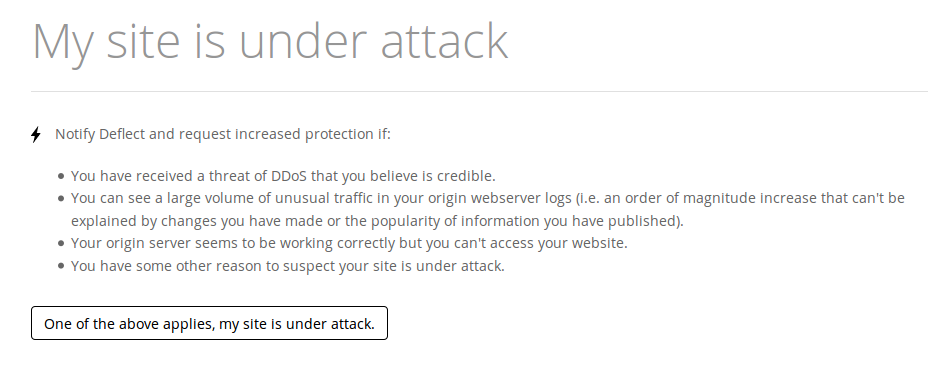
Report a DDoS attack
If you have good reasons to think that one of your website is under attack, you can report this to us. Next to the website’s name, in the top part of the screen, click on “My site is under attack”, and then click on “One of the above applies, my site is under attack” in the following screen. The Deflect team will immediately be notified that your website is under attack and increase the level of protection.
Challenging requests
When a DDoS attack is not automatically mitigated by Deflect rules and begins to have a negative impact on your server, you can enable the Challenger filter. It will help Deflect distinguish between real website readers (who are using a web browser) from automated bots. Challenger does this by serving everyone who requests access to the website a mathematical challenge in JavaScript – a SHA-inverse calculation, to be precise. The browser solves the challenge automatically and sends back their reply. The bot cannot do this. When a challenge has been solved, Deflect returns a cookie to the reader’s browser. No further challenges are required from this reader for the next 24 hours. For the challenger to work JavaScript needs to be enabled on the user’s side.
More information about the challenger and the white listing process can be found on this page.