When someone visits your website by entering a common URL starting with http:// their logins and passwords and other confidential data can be intercepted by undesired third parties. Strongly motivated attackers can even alter visited pages to try injecting malware into your users’ browsers.
Threats like these can be prevented by allowing your readers to access your website through a so-called encrypted tunnel TLS encryption, by using a URL starting with https:// instead of http:// (in many browsers you will see a green padlock next to the address bar when https:// is used). This option must be made available by the administrator of the visited website, and this page explains what you can do.
If you are enabling HTTPS connections for the first time on your website and you don’t have a TLS certificate yet, you have 3 options:
Ask Deflect to do everything for you #
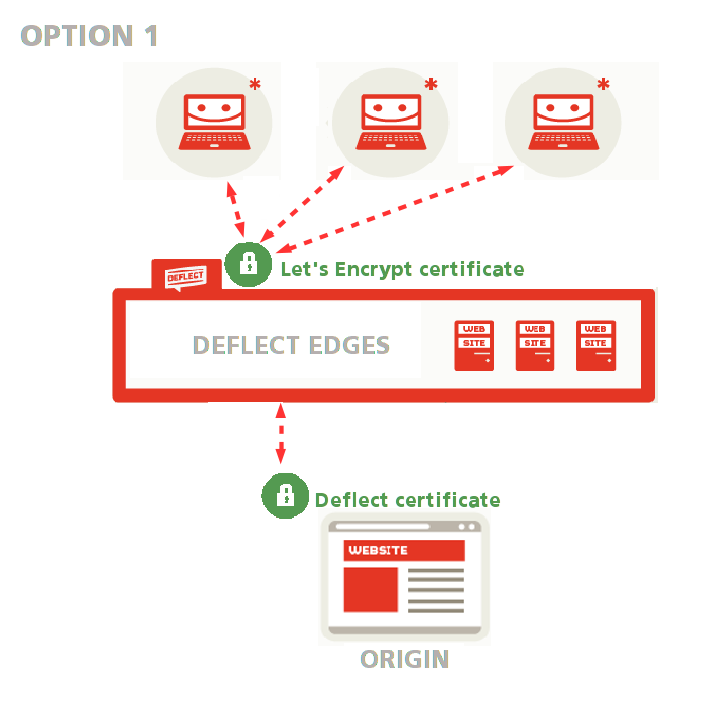
You can ask Deflect to do everything for you: we will generate a public-facing Let’s Encrypt certificate to encrypt connections between your readers and Deflect edges, and an origin certificate to secure connections between Deflect and your website (see option 1 in the public-facing certificate setup guide and option 1 in the guide to the Deflect Dashboard Control Panel).
This option is recommended if you are not familiar with OpenSSL. Both public-edge and edge-origin communications will be encrypted and the edge can validate that it is talking to your server rather than some other server impersonating yours.
Generate your origin certificate and have it signed by Deflect #

If you feel comfortable using OpenSSL, Deflect will only generate a public-facing Let’s Encrypt certificate, while you generate your origin certificate and have it signed by Deflect so that connections between edges and origin can be validated and Deflect can be sure that it is talking to your server(see option 1 in the public-facing certificate setup guide and option 1 in the guide to the Deflect Dashboard Control Panel).
This is an advanced option, recommended if you are comfortable using OpenSSL and creating a certificate signing request. You won’t need to share your private key with Deflect, and the edge will still be able to validate your origin certificate.
Generate a self-signed origin certificate #
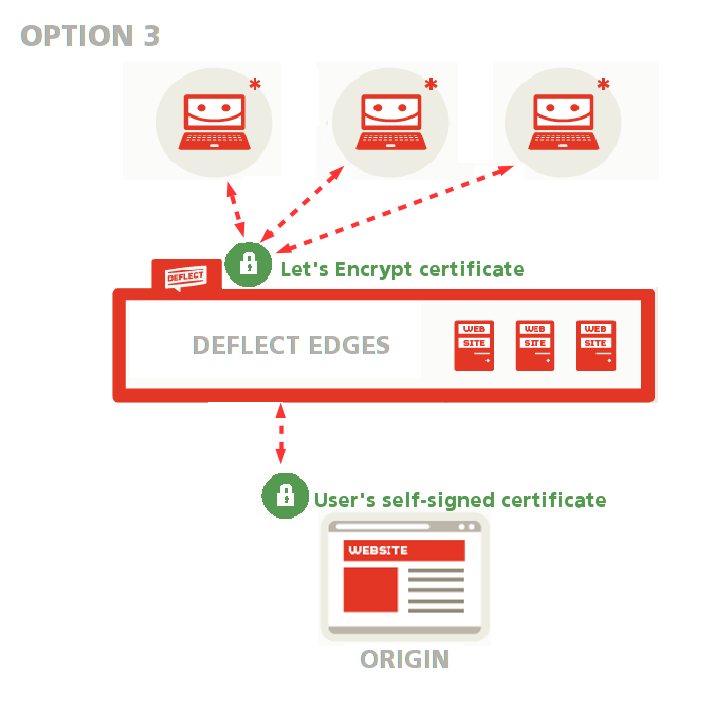
You can also generate a self-signed origin certificate without having it signed by Deflect. Deflect will only generate a public-facing Let’s Encrypt certificate, while connections between Deflect and your website will be encrypted through your own self-signed certificate (see option 1 in the public-facing certificate setup guide.
You can choose this option if you would rather not share your private key with anyone but have no experience with certificate signing requests. All connections will be encrypted, but Deflect will not be able to confirm that the certificate really belongs to you.
If your website already accepts HTTPS connections and you have a TLS certificate that you would like to keep using, you have two options:
Upload a custom TLS certificate bundle #
Upload a custom TLS certificate bundle – in this case, both connections to Deflect and connections between Deflect and your website will be encrypted through your TLS certificate (see option 2 in the public-facing certificate setup guide.
This option allows you to keep using the certificate you have already generated, but requires you to share your private key with Deflect.
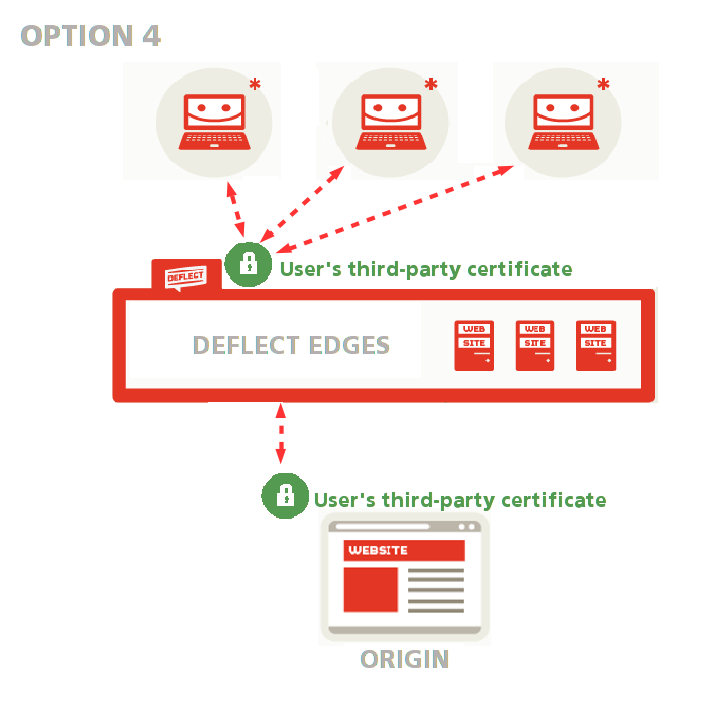
Use a third-party certificate on your origin server #

Ask Deflect to generate a public-facing Let’s Encrypt certificate while you use your third-party certificate as an origin certificate (see option 1 in the public-facing certificate setup guide.
This option allows you to keep using the certificate you have already generated without having to share your private key with anyone.