Skip to the content
DeflectDeflect
  • Solutions
    • Website Security
      • Caching
      • Encryption
      • On premise
    • Deflect Labs
      • Baskerville
      • Investigations
    • eQPress
  • Pricing
    • For business & individuals
    • For non-profits
  • Partners
  • Resources
    • Terms of service
    • Privacy notice
    • Documentation
  • About
    • News
    • Principles
    • In the media
    • Deflect clients
    • Testimonials
  • Login
  • Contact
  • Sign up
  • en
    • fr
    • es
    • pt

eQPress Hosting

16
  • eQPress Limitations
  • Overview of eQPress Hosting
  • Create a website on eQPress
    • How to create an empty WordPress site on eQPress
    • First steps with your eQPress site
  • Troubleshooting
    • You updated your site but still see the old one?
    • Still waiting for DNS to be updated and want to see your site?
    • Your DNS has been updated but you still can’t see your site?
    • When you try to open your website you only see a white screen?
  • Secure your eQPress website
    • Antispam recommendations
    • Protecting your WordPress website
    • Removing the WordPress “admin” user
    • Securing your site with HTTPS
  • Manage your eQPress website
    • Resources for learning WordPress
    • How to make your site temporarily inaccessible
    • eQPress Console: enhancing your WordPress admin panel
  • Migrate your website to eQPress
    • How to migrate your WordPress site

Registration & Setup Process

5
  • Step 1 – Register
  • Step 2 – IP and DNS setup
  • Step 3 – Admin Credentials
  • Step 4 – HTTPS/TLS
  • Step 5 – Finalize

Introduction

1
  • Get Started

Control Panel & Dashboard

22
  • Troubleshooting
    • How-to: Update your origin server IP with Deflect
    • How-To: Secure your origin server by allowlisting Deflect Edge IP
    • Troubleshooting SNI and 421 Misdirected Request
  • Website Settings
    • Labs Tab
    • Billing Tab
    • Users Tab
    • Settings Tab
    • Security Tab
    • Cache Tab
    • Baskerville Tab
    • HTTP/TLS Tab
    • Hosting Tab
    • DNS Records Tab
    • Stats Tab
  • HTTPS/TLS support
    • Enable HTTPS connections to your website under Deflect
    • How TLS/HTTPS works on Deflect
  • Report a DDoS Attack
    • Challenging Requests
    • Reporting an Attack
  • General
    • Contact Deflect Support
    • Two-Factor Authentication
    • My Account
    • Deflect Protected Websites
View Categories
  • Home
  • Docs
  • Control Panel & Dashboard
  • Report a DDoS Attack
  • Reporting an Attack

Reporting an Attack

< 1 min read

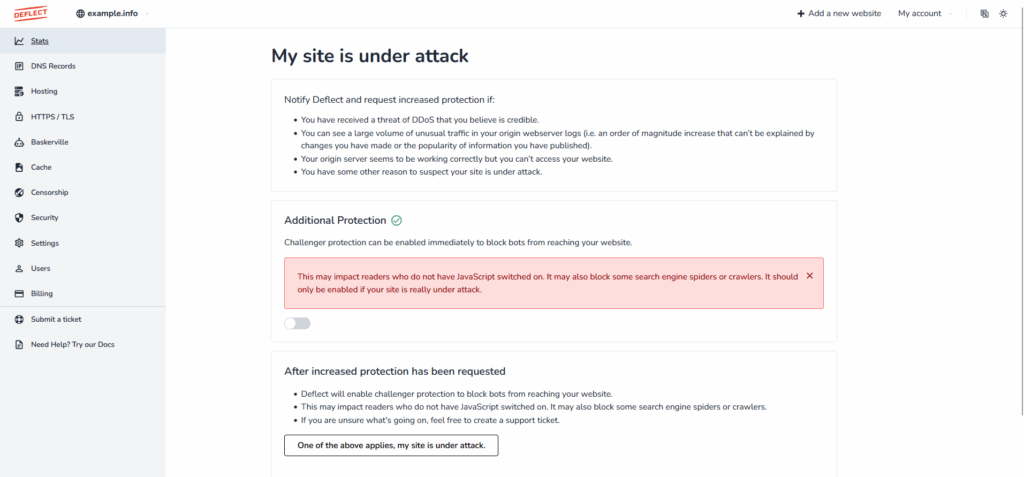
If you have good reasons to think that one of your website is under attack, you can report this to us.

Next to the website’s name, in the top part of the screen, click on My site is under attack, and then click on One of the above applies, my site is under attack in the following screen. The Deflect team will immediately be notified that your website is under attack and increase the level of protection.

Meanwhile, you can increase your website’s bot protection by enabling an additional feature. This feature activates a JavaScript challenger page that obliges bots to compute a cryptographic hash (proof-of-work), effectively decreasing or even halting most bot activity.

my_site_is_under_attack.png

Updated on August 27, 2025
revised

Is it helpful?

  • Happy
  • Normal
  • Sad

Share This Article :

Challenging RequestsChallenging Requests

© 2026 Deflect

Powered by WordPress

To the top ↑ Up ↑